(Find Original Article, Part 1 @ The Sharpologist)
Some of you out there may already be or at least toying around with the idea of moving your daily shave into the shower. I couldn’t encourage this move enough. A couple of motivating factors for this upheaval include: Speed, not in a bad way, you will still enjoy your shave at the same pace. What I refer to is clean up time, in my technique that is completely removed from the equation, being a by-product of the operation. You will also experience a closer shave due to the nature of a hot shower. Rather than taking a shower first and then setting up for a shave, where the pores are now suddenly in a state of temperature transition and closing, yours will remain open. It’s as if you are shaving while the hot towel is still on your face. The only down side to a shower shave is lack of space in most showers-but don’t worry, your friendly, neighborhood, wet shaver Douglas Smythe is on it!
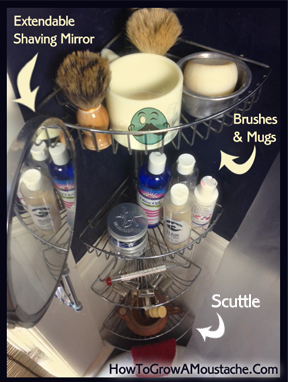
Meet the “Shower Shaving Station.” I admit the name is a little Jetson’s sounding and probably more so than what it need be, but stay with me. For those of you already familiar with my basic rig I apologize, for I must break it down once again for the folks just now tuning in. (see photo)
· Corner Rack: Holds Scuttle, Soaps, Mug, etc. And up until recent innovations, it also held my razors and brushes.
· Double-Sided Extendable Shaving Mirror: The swivel extendable arm is great in preventing fogging up for it can be pushed away from the source when not in use. Also, the magnified side is great for fellas with facial hair that need to do fine detailing.
This set-up has pretty much remained unchanged for years, but recently I have been tricking it out a tad with even more convenience and maintenance in mind.
My newest Shaving Station hacks stem from the concept of rather than building something new for the purpose, consider repurposing pre-existing objects first. That may just be a wordier or round-about way of saying I am lazy. Well, maybe not lazy, but that I have yet to build that custom, cherry wood razor shelf…but I will when my collection stops growing. Yeah, my girlfriend doesn’t believe that one either.
That said, the first new addition we will look at is my new “Razor Rack,” once a lonely, hardly used belt rack (see photo). Like many of you dapper cads, I will use a variety of razors during the course of the week for my SOTD. Many a time I would already find myself in the shower lathered up and ready for the first pass when I realized that I forgot the slant I wanted to use that day. Rather than hop out, dry off, and glide my way like an inch worm on the floor mat to the cupboard to retrieve it, I would settle for yesterday’s razor. Maybe I am lazy? Regardless, those days are over with my new/repurposed rack.
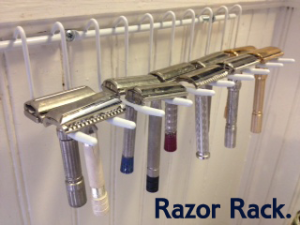 The rack holds exactly 10 modern and vintage safety razors. Now I have more options to choose from right on site. The belt rack is made of coated metal, making it water proof and perfect for the job at hand. You can pick one up for under five dollars at your local home supply store or like me, possibly use the one you already have collecting dust in your closet. A quick search online and you will find many different styles and sizes to choose from that will work in your space.
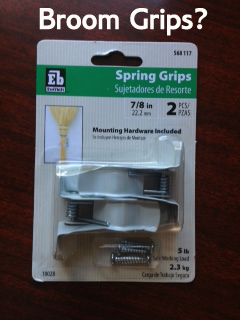 Now let us look at the “Brush Grips.” The brush grips are actually repurposed Broom Grips that you can find online or in most hardware stores. I chose to use the push open spring clip design for my purpose. But poke around and check out a couple different variations to see what works for you. For standard fiberglass shower stalls the Push Clip adhered with waterproof double-sided tape may work better. Experiment!
If you decide to go the route I did with the push open design you will need to “stretch” the spring. I did this in much the same fashion one uses a classic wooden “shoe stretcher” to re-size old shoes or break in new ones or like one wears in a new baseball mitt with oil and wire then leaves under the bed till Spring.
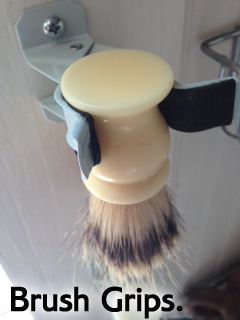 Find a larger object, be it cylindrical or rectangular, to clip the grips on and leave them attached for a week or two. In my case I used an old nightstick, don’t ask. This can be done before or after mounting the brush grips. Though the grips are coated metal I recommend lining the insides with adhesive rubber padding to protect the handles of your favorite brushes. You can even go as far as wrapping the padded grips in water proof electrical tape to insure they stay put. I chose to put the padding on and mount them before inserting the billy club. This allowed for the adhesive on the padding to bond more thoroughly with the grips.
Hanging your brushes in this manner will allow them to dry faster (thank you gravity) and limit their eventual degradation caused by stearic acid and soap scum build up. When left to dry standing on its base, no matter how clean you think the filaments are, these unwanted properties will settle at the base of the knot and overtime eat away at the glue. Embrace gravity and work with it.
Hope these new tips and tricks prove useful to you. Every shower is different for the most part, but don’t let that be a turn off to trying out some of these concepts. With a little improvisation, modification and an hour traipsing around a hardware store, you will be surprised how many everyday, and not so everyday objects you can repurpose. Good Luck & Happy (Shower) Shaving!
Creator of fine male grooming products and founding member, contributing writer & editor for “ How to Grow a Moustache”, an innovative, cutting edge blog dedicated to all things facial fur, wet shaving, style & travel [basically a Man Blog]-His mission: Create facial awareness and use his super powers [read: moustache] for good. Contact Douglas: whiskers@howtogrowamoustache.com
Don’t forget to enter our Monthly Giveaway for a chance to win a Vintage Gillette and More! For more info visit Monthly Giveaway
[sign up in Right Sidebar]


